Creating Wifi hotspot can really piss you off if you are unaware of the proper techniques of creating one. With some simple steps you can easily create your own wifi hotspot without using any software. By creating your own wifi hotspot for windows you can easily share your computer’s internet with your smartphones and tablets.

In this guide I will we sharing how to create wifi hotspot for windows 7 /8/10. This concept of Wireless Hosted network came up with Windows 7. To execute this technique all you require is Command Prompt a.ka CMD with Administrator privileges. This process includes some of the commands that are available only in Windows 7 or Windows 8 or Windows 10.
Create Wifi Hotspot Using CMD
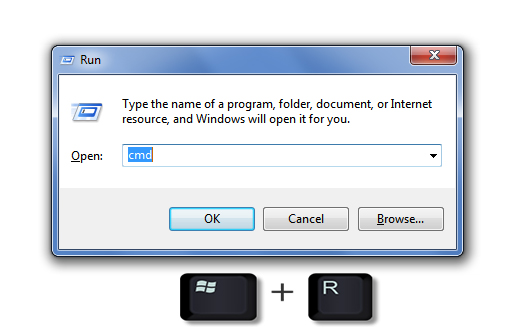
Step 1: Open CMD
Open Command Prompt (Admin) as an administrator or Press ‘Windows’ and ‘R’ at the same time and enter ‘cmd’ and click ‘enter’.
Step 1: Enter The Command
Now enter below command.
netsh wlan show drivers
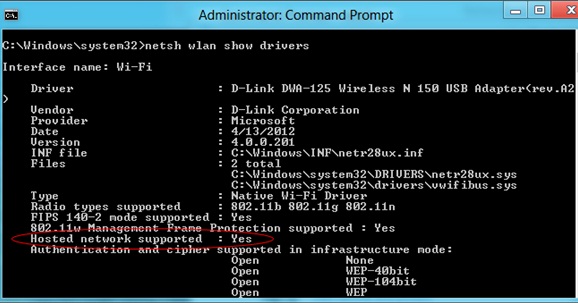
This will show the output as shown in the image. If the output has this ‘Hosted network supported :Yes', this verifies that your computer supports hosted networks.
We recently published a step by step guide on how to install active directory user and computer tools on windows 10, 8, and also 7. If you would also like to know how this can be done, do check out our in-depth article.
Step 2: Enter The Command
Now enter the below command in CMD itself.
netsh wlan set hostednetwork mode=allow ssid=Hotspotname key=password
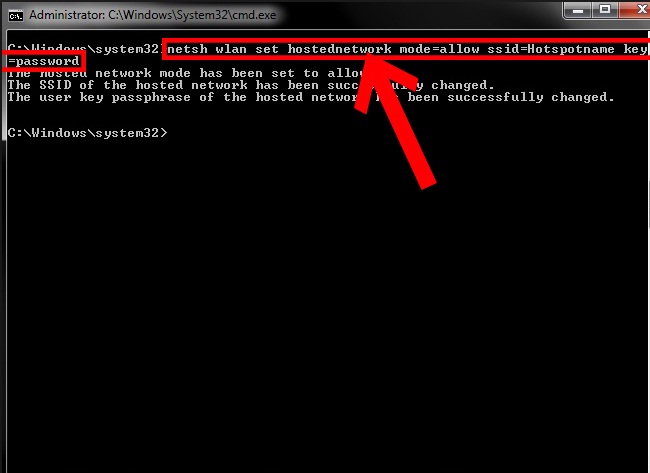
Here ssid= Your Wi-Fi Name and Key = Your Password. Hit enter and this will create a wifi hotspot in your windows, which is currently offline.
Step 3: Activate Wifi Hotspot
Now you have to activate the hotspot. To do this you need to enter the below command and then hit enter,
netsh wlan start hostednetwork

This starts your very own hotspot that you’ve just created.
Step 3: Share Internet Connection In Windows
To share your internet with other devices you’ve got to play with your windows network settings. To do this:
- Click or press the windows button.
- Then type Network and sharing.
- Click on Change adapter setting
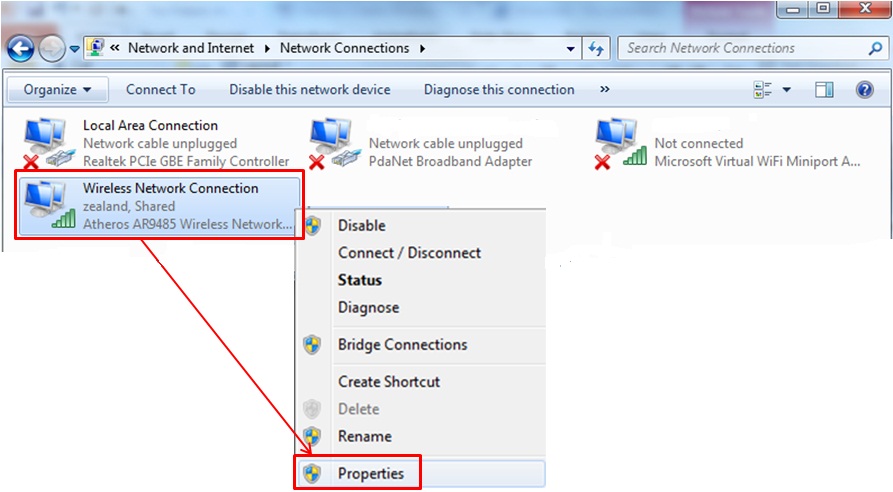
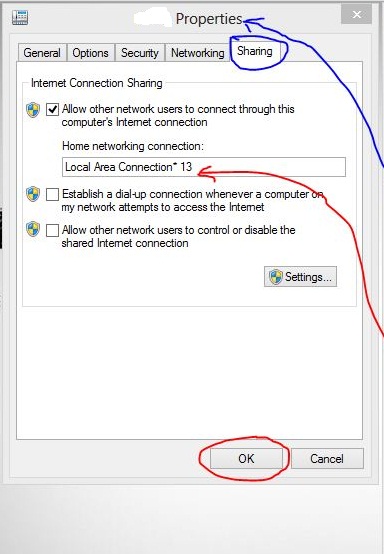
Here right click on the Connection that you use to connect to internet and then select properties. In properties click on Sharing tab and check the box “Allow other network users to connect through this computer’s internet connection and select the network connection name that is used by your hotspot.(For this check the Network Connection Window and look for Connection which says Microsoft Hosted Network Virtual Adapter). And save it. Now your internet connection is shared.
Are you facing an error while using Netflix? Check out this post and know how to easily fix the M7111-1931-404 Netflix error.
Conclusion:

So now I guess you know how to create wifi hotspot for your windows 7/8/10 and using this hotspot you can share internet from your Windows to your smartphones, tablets or laptop and enjoy seamless wireless connection. If you think this too much for you and you don’t want to play with CMD, you can take help of a software called Connectify, which itself creates a wifi hotspot without any hassle. I will soon publish a guide on how to use Connectify to create a hotspot, so stay tuned to read the guide.