Since it’s a tech era, almost every next person is using computers. Gone are the days when we used to send and receive handmade greeting cards and used to make searches like how to make handmade greeting cards on google.
Now almost all people prefer creating cards on the computer and send them to their friends. If you don’t know how to make a greeting card on your computer, then this guide will probably help you.
In this guide i.e how to make a birthday card, I will make you know how to make birthday cards with Microsoft Office. Read out the guide carefully and learn to create a bday card on your computer.
How to Make Birthday Card on the Computer
The guide will basically tell you the steps to create the bday card in MS PowerPoint. Since Ms office is a vast program it allows users to create greeting cards as well.
The steps to make a greeting card in the MS office are given below. Do follow them and learn to create a Bday card.
Before proceeding to the steps, first decide what images, content, message, and graphics you want on your card. Once you will be specific about the design, it will help your work be done faster.
Once you are sure about the graphic and design, follow the below steps.
Step 1: First of all, launch the MS office program on your computer. To do so, go to the start menu and then click on all programs.
In the list of all programs select MS office and then click on MS PowerPoint.
Start>All programs> Ms office> Ms powerpoint
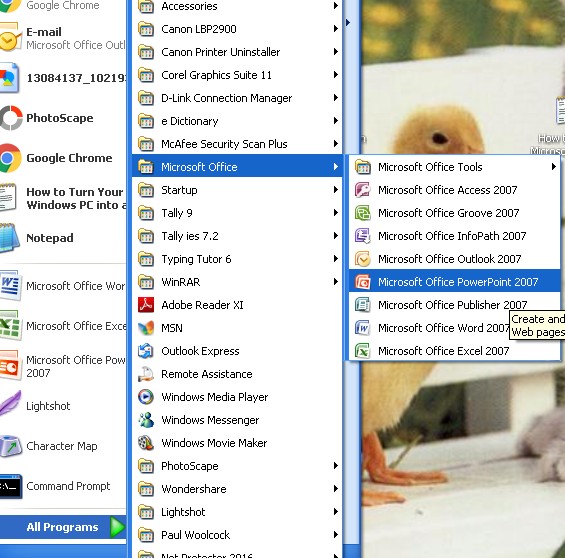
Step 2: As sooner the program would launch, you will see a slide. Change the layout of the slide and make it blank.
Step 3: Now change the background color by going to the design section from the menu bar. If you notice, at the top right side there is the word Background followed by a small arrow-like shape. Click on the shape.
A Format Background window will pop up.
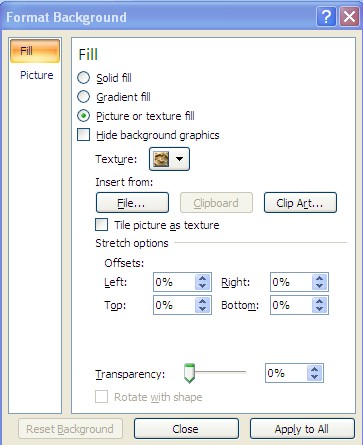
This is where you can set the background of your choice. Once done with the setting up background, follow the next step.
Step 4: After setting up the background for the card, it’s time to insert the image. If you already have any images saved to your system open them. Else download a one for you.
To insert the image, go to the Insert menu and select the option Picture. Clicking the picture will open up an Insert picture dialogue box, where you have to select a picture you want to insert the card.
After opening the picture, follow the next step. I have opened an image and have taken the screenshot. Look that below.
Step 5: Now go to the Picture tools format. For that, click on the picture. As sooner you do that, picture tools will appear at the top of your screen. If you notice, an option Format will also appear. Click on that.
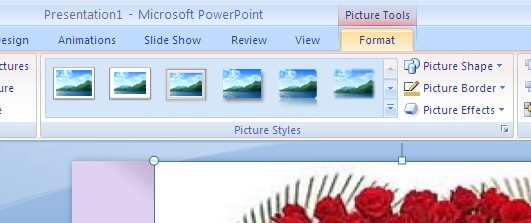
Here, you can make the changes to the image accordingly. For example, if you want to crop the image, then click on the crop option. The option you will find at the top right corner.

With this option, you can remove any unwanted portion of the image. For example, in my image, there is some white space and I want to remove that. In such a case, first I will select the crop option and then adjust the area.
Step 6: After cropping, you can change the picture style. For that, you will have to go to the Picture style section from the top of the screen. Check out the screenshot I have mentioned below if you didn’t get me.
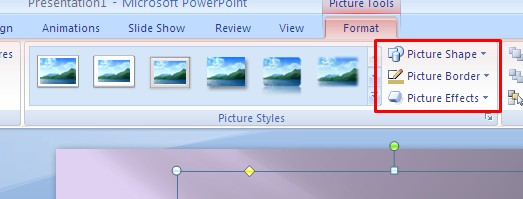
As you can see in the above image, there are limited styles showing on the screen. If you want more styles, then you will have to click on the arrow at the right side of the styles for more. I have marked the arrow with red in the above image.
You can select any style you want. For example, I have selected the Bevel perspective. And I also added the reflection picture effect. You will find the picture effect just beside the picture style in the same section.
You can also add borders. For this select the option Picture border.
Step 7: After the designing part is done, insert some text or message to the card. For this, either select the Word art or text box.
Apart from that, you can also Text effect, Text fill, and Text outline by going to the WordArt style.
Check out the image I have mentioned below.
Step 8: Once you are done with adding text, it’s time to add shapes to the card. For this go to the insert menu and then select the Shapes. Select any of the shapes you want.
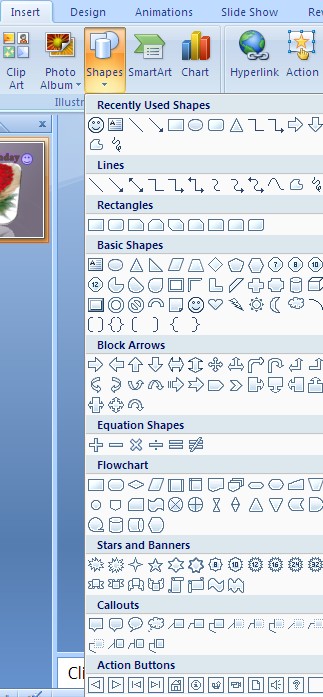
You can also change the color and type of the shapes by going to the Quick style. You will find the option in the drawing section.
Check out the image below if you are not able to find the option.
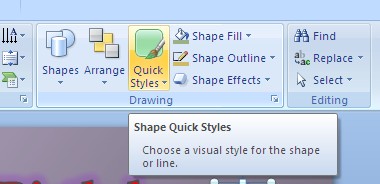
This is how you can create a card. You can also adjust and add new pictures. Moreover, you can also change the picture if you want. Apart from that, you can also increase the brightness and contrast of the image.
For this, you will have to go to the Adjust section on the left side of the screen. Check out the image I have mentioned below.
So, this is how to make a birthday card on the computer. Not only in PowerPoint but in Ms words as well you can create and design a card for yourself.
Designing the card depends on your creativity. I would suggest you, before proceeding, first decide what you want and how you imagine your card to look like. Once you will do that, creating a card will not seem a tough job to you at all.
If you have any more doubts remain, you can drop your comment in the comment section below.
If you liked the article, you can share it on your social media platforms. We will appreciate your share!
Quick Links
