Kodi is a powerful media player that lets you watch movies, TV shows, and live sports. It’s also customizable, letting you install add-ons and tweak the look and feel to suit your needs.
Kodi can be installed on a range of devices, including Windows PCs, Macs, Android smartphones and tablets, and now Apple TVs. In this article, we’ll show you how to install Kodi on your Apple TV using three different methods.
App Store and searching for Kodi in 2 Easy Ways

The first way to install Kodi on Apple TV is by using Xcode. Xcode is a development tool for macOS that can be used to create apps and software for Apple devices.
- To install Kodi using Xcode, you will need a Mac computer running macOS Catalina or later. You will also need to download the Kodi deb file from the Kodi website.
- Once you have downloaded the Kodi deb file, open Xcode and create a new project. Select the “Single View App” template and click Next.
- On the next page, enter “Kodi” as the project name and click Finish. Xcode will now create a new project with the Kodi deb file.
- Next, select the “Kodi” project in the Project navigator and click on the “General” tab.
- Under the “Identity” section, change the Bundle Identifier to com.xbmc.kodi and click on the “+” button under the “Embedded Binaries” section. Select the Kodi deb file and click Open.
- Now that the Kodi deb file is added to the project, you can compile and run it on your Apple TV. To do this, connect your Apple TV to your Mac using a USB-C cable.
- Then, select your Apple TV from the “Scheme” drop-down menu and click on the “Run” button. Xcode will install Kodi on your Apple TV and you should see the Kodi home screen on your TV.
The second way to install Kodi on Apple TV is by using the tvOS App Store. To do this, you will need an Apple TV that is running tvOS 13 or later.
- On your Apple TV, go to the App Store and search for “Kodi”. Select the Kodi app from the search results and click on the Get button. The Kodi app will now be downloaded and installed on your Apple TV.
- Once the installation is complete, you will see the Kodi icon on your home screen. Select it to launch the app and you should see the Kodi home screen on your TV.
- You can now start using Kodi on your Apple TV. To watch a movie or TV show, you will need to add some content sources. For example, you can add the official Kodi repository which contains a wide range of popular add-ons. Alternatively, you can also install third-party add-ons that offer streaming content from various sources.
Installing Kodi on your Apple TV is a great way to watch your favorite movies and TV shows on the big screen.
How to set up Kodi on Apple TV for the first time
1. Before we get started, make sure that you have the latest version of tvOS installed on your Apple TV. You can check this by going to Settings -> System -> Software Updates. If there’s an update available, go ahead and install it.
2. Once you’ve updated your Apple TV, the next thing you’ll need to do is download the Kodi app. You can do this directly from your Apple TV by going to the App Store and searching for Kodi.

3. Once you’ve found the Kodi app, go ahead and download it. It’s a free app, so you shouldn’t have any trouble with this.
4. Once the Kodi app is downloaded, launch it and you’ll be greeted with the first-time setup screen. Here you can choose your language, set up remote control access, and configure a few other options.
5. After you’ve gone through the initial setup, you’ll be taken to the main Kodi interface. From here you can start adding content to your library. We’ll cover that in more detail below.
6. The first thing you’ll want to do is add some repositories. Repositories are essentially online stores for Kodi add-ons. They allow you to browse and install add-ons from within Kodi itself.
There are a few different repositories that you can choose from, but we recommend using the official Kodi repository.
7. To add the official Kodi repository, go to Settings -> Add-ons -> Install from Repository. Scroll down and select the Kodi Add-on Repository, then click on Video Add-ons. Here you’ll find a list of all the available video add-ons.

8. Browse through the list and find an add-on that you want to install. We’ll be installing the YouTube add-on for this example. Once you’ve found the add-on that you want, click on it and then select Install.
9. The add-on will now be installed and you’ll be able to use it from the main Kodi interface. To launch the add-on, go to Videos -> Add-ons and select the YouTube add-on.
10. That’s it! You’ve now successfully installed Kodi on your Apple TV and can start watching your favorite videos.


How to Install Kodi on Apple TV with a PC?
Before you begin, you will need to have a PC with Kodi installed. You can download Kodi for free from the official Kodi website.
Once you have Kodi installed on your PC, follow these steps to install it on your Apple TV:
1. Connect your Apple TV to your PC using a USB cable.
2. Launch Kodi on your PC.
3. Select the “Settings” option from the main menu.

4. Select the “System” option.
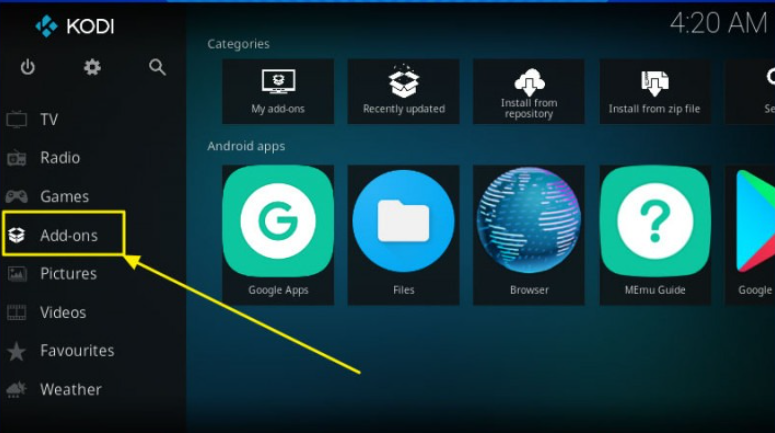
5. Select the “Add-ons” option.
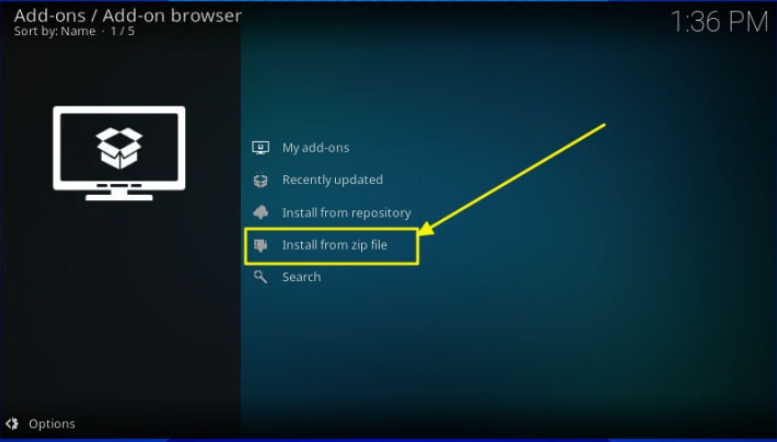
6. Select the “Install from zip file” option.
7. Navigate to and select the Kodi installation file that you downloaded earlier.
8. Wait for Kodi to install on your Apple TV.
9. Once the installation is complete, you will be able to launch Kodi from your Apple TV’s home screen.
There you have it! You have now successfully installed Kodi on your Apple TV using a PC.
Quick Links
Conclusion- How To Install Kodi On Apple TV 2024
Kodi is a popular media streaming app that can be installed on a variety of devices. In this blog post, we’ve shown you how to install Kodi on Apple TV in two easy ways.
We hope you found this information helpful and that you will enjoy using Kodi on your Apple TV.